

How to Clean & Care for Boxing Gloves So They Last for Years

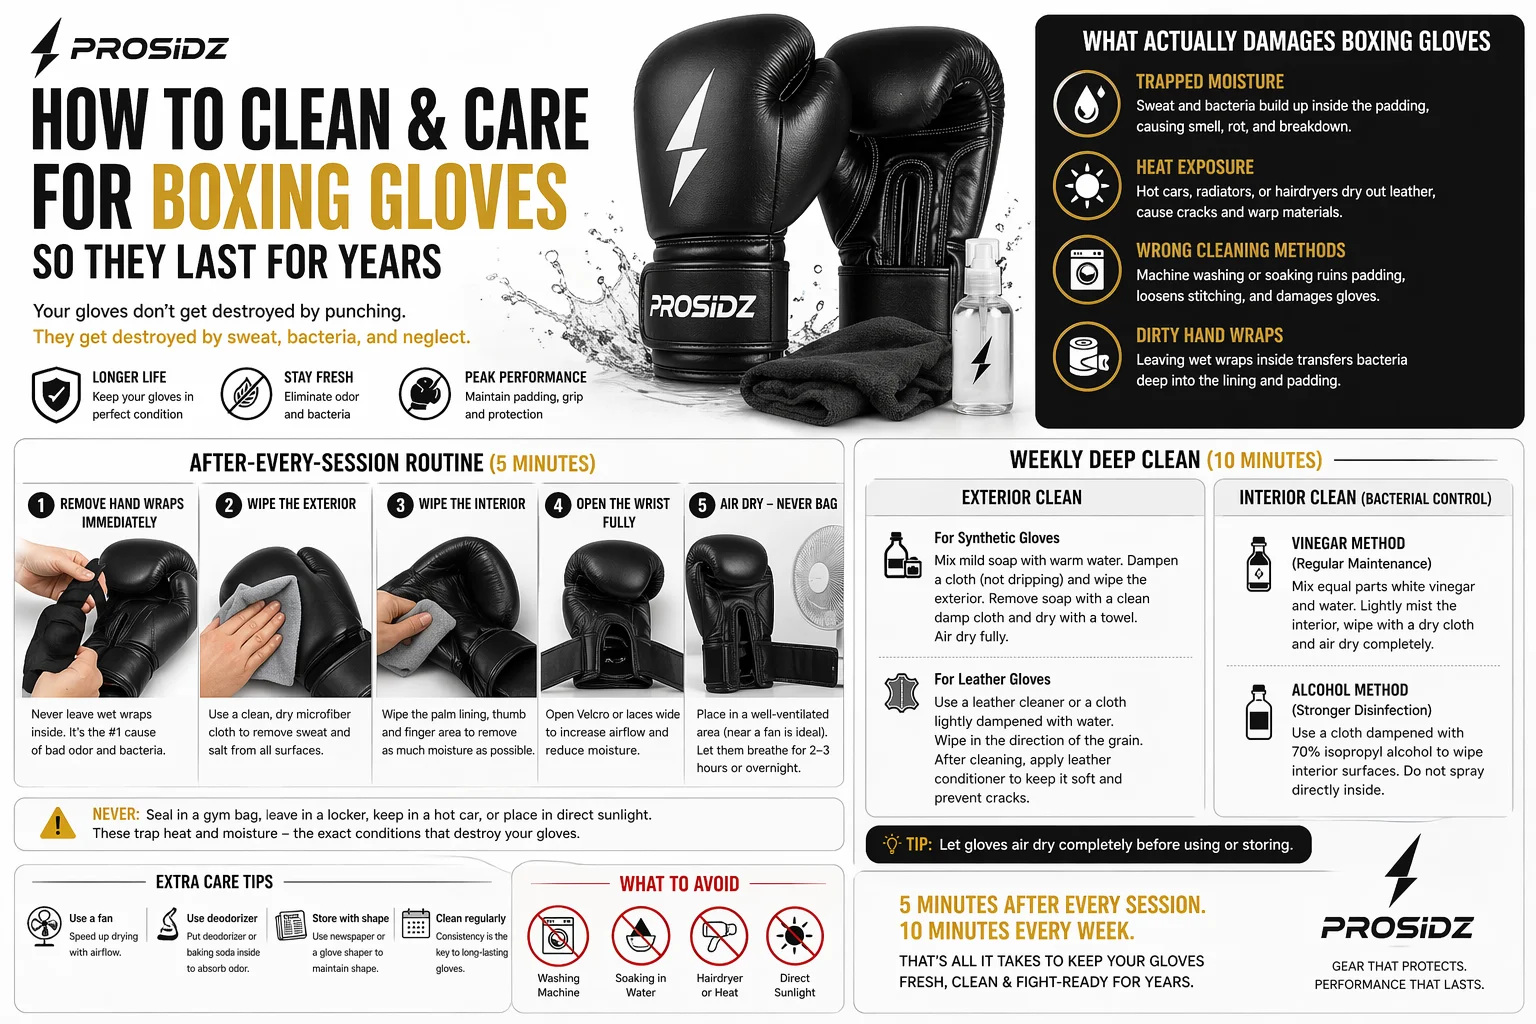
How to Clean & Care for Boxing Gloves So They Last for YeaThe Truth Nobody Tells You About Boxing Gloves
Here is something most fighters only realise after their second or third pair: your gloves are not destroyed by punching. They are destroyed by what happens after training.
Every session fills your gloves with sweat, body heat, and bacteria. The thick foam padding and enclosed construction create the exact warm, dark, damp environment that odour-causing bacteria thrive in. Leave gloves sealed in a gym bag overnight and bacteria colonies establish themselves in the lining within hours.
The result? Gloves that smell like a biohazard after three months, foam padding that compresses unevenly, leather that cracks at the joints, and stitching that separates at the wrist — all from neglect, not from hard training.
The good news: a five-minute routine after every session and ten minutes of weekly care is all it takes to keep quality gloves performing and smelling fresh for years.
What Actually Damages Boxing Gloves
Before getting into the cleaning routine, understanding what causes damage helps you avoid the most common mistakes.
Trapped moisture is the number one cause of glove deterioration. Sweat soaks into the foam padding and lining. If it cannot escape, bacteria multiply rapidly, producing the acids that break down foam, rot the inner lining, and generate persistent odour that no amount of cleaning can fully reverse once established.
Heat is the second biggest enemy. Leaving gloves in a hot car, drying them with a hairdryer, or storing them near a radiator dries out leather rapidly, causes cracking at the knuckle joints, warps synthetic materials, and degrades the adhesive that bonds foam layers together.
Wrong cleaning methods cause as much damage as neglect. Machine washing destroys foam padding structure, loosens stitching, warps wrist supports, and shrinks linings. Soaking gloves in water produces the same result as trapped sweat — prolonged moisture that cannot escape and accelerates internal breakdown.
Dirty hand wraps left inside gloves are one of the most overlooked causes of rapid glove deterioration. Soaked wraps pressed against the glove lining overnight transfer bacteria directly into the padding — this is where most odour problems begin.
The After-Every-Session Routine (5 Minutes)
This is the most important habit. Do this every single time you train, without exception.
Step 1 — Remove hand wraps immediately
Pull your hand wraps out the moment you take your gloves off. Never leave wet wraps inside gloves. Even for an hour, saturated wraps pressed against the lining accelerate bacterial growth faster than any other single factor.
Step 2 — Wipe the exterior
Use a clean, dry microfiber cloth or towel to wipe the entire exterior — knuckle area, wrist cuff, sides, and back of the glove. Remove all surface sweat before it dries into the material and creates salt deposits that degrade stitching over time.
Do not use chemical-based wipes or antibacterial wet wipes on the exterior at this stage — repeated use of harsh chemicals fades synthetic materials, dries leather, and leaves a residue that attracts more grime.
Step 3 — Wipe the interior
Push a dry cloth as far inside the glove as you can reach and wipe the palm lining, thumb pocket, and finger area. Get as much surface moisture out as possible before the gloves go anywhere near storage.
Step 4 — Open the wrist fully
Pull the Velcro or lace opening as wide as it will go. This dramatically increases airflow into the glove interior and is the single most effective step for moisture control.
Step 5 — Air dry — never bag
Place gloves in a well-ventilated area with the wrist opening facing up or outward. Near a fan is ideal. A cool, shaded spot with good airflow works perfectly.
Never: Seal gloves in a gym bag, put them in a locker with the door closed, leave them in a hot car, or place them in direct sunlight. All of these trap heat and moisture — the exact conditions that destroy padding and breed bacteria.
Allow at least 2–3 hours of airflow before storing. If you train daily, leave gloves out overnight in a ventilated space.
The Weekly Deep Clean (10 Minutes)
Once per week — or more frequently if you train daily — do a proper interior and exterior clean.
Exterior Clean
For synthetic gloves: Mix a small amount of mild liquid soap with warm water. Dampen a cloth — wrung out thoroughly, not dripping — and wipe the entire exterior. Follow with a clean damp cloth to remove soap residue, then dry immediately with a towel. Allow to air dry fully before storing.
For leather gloves: Leather requires gentler treatment. Use a specialist leather cleaner or a cloth very lightly dampened with clean water only. Wipe in the direction of the leather grain. Never use harsh soaps, alcohol directly on the surface, or abrasive cloths — all of these strip the natural oils from leather and accelerate cracking.
After cleaning leather, apply a small amount of leather conditioner with a soft cloth. This replaces the oils lost through sweat and cleaning, keeps the leather supple, and prevents the cracking at knuckle joints that makes gloves look and feel aged far too early.
Interior Clean — Bacterial Control
This is where most odour originates and where most fighters do not clean thoroughly enough.
Vinegar method (most effective for regular maintenance): Mix equal parts white vinegar and water in a spray bottle. Lightly mist the interior of each glove — do not saturate. The mild acidity neutralises bacterial colonies without damaging foam, lining, or leather. Wipe with a dry cloth, then air dry completely. This method is safe for both leather and synthetic gloves.
Alcohol method (for stronger disinfection): Dampen a cloth with 70% isopropyl alcohol and wipe the interior surfaces you can reach. Do not spray alcohol directly into the glove — the direct mist can penetrate too deeply and stay wet in the foam. A cloth application gives controlled moisture. Follow with thorough air drying.
Baking soda method (odour neutralising): Sprinkle a tablespoon of baking soda into each glove after cleaning. Leave overnight. The baking soda absorbs embedded odours from the foam. Shake out completely before training — residue inside the glove will irritate skin and cause discomfort during sessions.
Monthly Care — Keeping Gloves in Peak Condition
Leather conditioning (leather gloves only)
Once per month, apply a dedicated leather conditioner or a small amount of coconut oil on a soft cloth to the entire leather exterior. Work it into the material in circular motions, paying extra attention to the knuckle area and wrist joint where cracking typically begins first.
Allow it to absorb for 15–20 minutes then buff off any excess with a clean cloth. Well-conditioned leather stays supple, resists cracking, and maintains the premium feel that makes leather gloves worth the investment.
Padding check
Press firmly on the knuckle area and the back of each glove. Quality foam springs back quickly and fully. If you feel the padding compressing significantly without returning, or if certain areas feel noticeably thinner than others, the foam is beginning to fail. This is a safety indicator — gloves with compromised padding no longer protect your hands adequately during impact.
Stitching inspection
Check the seams at the finger junctions, wrist strap edges, and the main body panels. Early-stage stitching separation can sometimes be caught before it becomes structural — a cobbler or leather repair shop can re-stitch problem areas and significantly extend glove life.
Wrist strap check
Test the Velcro by fastening and unfastening several times. Velcro that has collected lint and foam fibres loses its grip. A stiff-bristled brush (an old toothbrush works perfectly) dragged across the Velcro surface removes debris and restores grip strength significantly.
How to Get Rid of Bad Smell Already in Your Gloves
If your gloves already smell strongly, you need a targeted odour removal process — not just regular maintenance.
Step 1 — Freeze them Place each glove in a sealed plastic bag and put them in the freezer overnight. Sub-zero temperatures kill most odour-causing bacteria without using any moisture or chemicals. Thaw at room temperature and air dry fully before the next step.
Step 2 — Baking soda treatment Pack the interior of each glove generously with baking soda. Leave for 24–48 hours. The baking soda draws embedded bacterial acids out of the foam. Shake out completely and air dry.
Step 3 — Vinegar wipe Follow with a thorough interior wipe using the 50/50 vinegar and water solution. Allow to air dry completely — at least 24 hours — before training again.
Step 4 — Cedar deodoriser inserts After completing the odour removal process, place cedar wood deodorisers or activated charcoal inserts inside each glove during storage. Cedar naturally absorbs moisture, prevents bacterial regrowth, and keeps gloves smelling neutral between sessions. Replace every 4–6 months.
The 7 Habits That Make Gloves Last Years Longer
1. Always use hand wraps. Hand wraps absorb the majority of sweat before it reaches the glove lining. Clean wraps mean a clean glove interior. Wash your hand wraps after every session — they are machine washable.
2. Never seal gloves in your gym bag after training. This is the fastest way to destroy gloves. Always air them out before storage, even if just for an hour.
3. Never put gloves in the washing machine. The agitation destroys foam structure, the water saturates padding for days, and the heat of tumble drying warps and shrinks the interior. Hand-clean only.
4. Never use a hairdryer or heat source to dry. Heat degrades leather, warps synthetic materials, and breaks down the adhesive bonding foam layers together. Air drying only.
5. Rotate between two pairs if you train daily. One pair in full airflow while the other is in use means padding never stays compressed and moist for consecutive sessions. This doubles the life of both pairs.
6. Store in a cool, ventilated space — not a gym bag. Between training sessions, hang gloves or place them on a shelf with airflow. A mesh bag or gear hook is ideal.
7. Condition leather monthly. Leather gloves without regular conditioning crack within months. Conditioned leather gloves can last 5+ years under heavy training.
When Is It Time to Replace Your Boxing Gloves?
No amount of cleaning extends gloves past their functional lifespan. Replace your gloves when you notice any of these signs:
Compressed padding that does not spring back. Press the knuckle area firmly. If it stays compressed or feels significantly thinner than when new, the foam has broken down. Training with failed padding risks hand fractures and wrist sprains.
Persistent odour that does not respond to cleaning. Once bacteria have colonised deep into foam padding, surface cleaning cannot reach them. If deep cleaning and baking soda treatments no longer eliminate the smell, the lining has deteriorated beyond recovery.
Cracked or peeling exterior. Leather that has cracked deeply or synthetic material that is peeling apart can no longer protect the structural foam underneath from sweat and impact.
Separated stitching at structural points. Seam separation at the knuckle panel or wrist cuff compromises the glove’s ability to maintain its shape under impact — a safety issue, not just cosmetic.
Loose or failed wrist strap. A wrist strap that no longer closes securely cannot protect your wrist during striking. This is a direct injury risk.
As a general guide: Budget synthetic gloves last 12–18 months under regular training. Mid-range gloves last 2–3 years with proper care. Premium leather gloves with consistent maintenance can last 4–5+ years.
Hand Wraps — The Cheapest Way to Extend Glove Life
Hand wraps are your gloves’ best protection. They absorb up to 80% of the sweat that would otherwise reach your glove lining directly, protecting the foam and lining from the bacterial buildup that destroys gloves from the inside.
Wash hand wraps after every session — they are machine washable. Use a mesh laundry bag to prevent tangling. Keep 2–3 pairs rotating so you always have a clean, dry pair ready for every session.
Never train without hand wraps unless specifically doing very light technical work. The habit of always wrapping pays back in hand health, glove longevity, and wrist protection every single training session.
Shop Boxing Gloves & Accessories at Prosidz.com
Taking care of quality gloves starts with buying quality gloves. At Prosidz we stock boxing gloves built to last — and the accessories to keep them performing.
👉 Shop Boxing Gloves → 👉 Shop Hand Wraps → 👉 Shop Glove Deodorisers → 👉 View Full Boxing Gear Collection →
Frequently Asked Questions
Can you put boxing gloves in the washing machine? No. Machine washing destroys the foam padding structure, loosens stitching, warps wrist supports, and causes the lining to shrink and deteriorate. Always clean boxing gloves by hand using a damp cloth — never by machine washing or soaking in water.
How do you get the smell out of boxing gloves? The most effective method combines freezing (kills bacteria), baking soda treatment (neutralises odour acids in the foam), and a diluted white vinegar wipe (kills residual bacteria). Follow up with cedar or activated charcoal deodorisers stored inside the gloves between sessions.
How often should you clean boxing gloves? Wipe down inside and out and air dry after every single session. Do a proper interior antibacterial clean once per week. Condition leather gloves once per month. This routine prevents odour buildup and extends glove lifespan significantly.
Why do boxing gloves smell so bad? The enclosed construction traps sweat in warm, dark foam — ideal conditions for bacteria to multiply. Bacteria produce acidic waste compounds that cause the characteristic sour smell. The smell intensifies when gloves are sealed in a gym bag while still wet, accelerating bacterial growth overnight.
How long should boxing gloves last? Budget synthetic gloves: 12–18 months with regular use. Mid-range gloves: 2–3 years with proper care. Premium leather gloves: 4–5+ years with consistent cleaning and conditioning. Skipping the after-session care routine can cut any glove’s lifespan in half.
Can I use antibacterial wipes to clean boxing gloves? Use alcohol-based antibacterial wipes sparingly on the interior only — not the leather or synthetic exterior. Repeated use of harsh chemicals on the exterior fades colour, dries leather, and degrades synthetic materials. A diluted vinegar solution or specialist sports equipment spray is safer for regular use.
Should I use hand wraps every session? Yes, always. Hand wraps absorb the majority of sweat before it reaches your glove lining, protecting the foam and interior from the bacterial buildup that causes odour and deterioration. Wash wraps after every session to keep them effective.
Last updated: April 2026 | Written by the Prosidz gear teamrs